Sunday, March 25, 2012
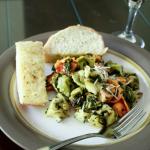
Lasagna Soup

It’s such a lovely day today here on the west coast of Canada. The sun is shining, the flowers are beginning to bloom, and the kids are just itching to play outside. (Dare I say it? Ok, here I go…) I think Spring may be here at last! It’s been particularly cold and dreary here up until now, which is why I made this warm and comforting Lasagna soup the other day. Nothing chases away the chill of the cold outdoors like hot soup in your belly, although I think this is a perfect meal for hotter weather as well because you don’t have to turn on your oven to enjoy the taste of lasagna. It really does taste like deliciously cheesy lasagna in a bowl. We all loved it; all of us, that is, besides Cole. He said it was okay but he doesn’t like lasagna so this couldn’t be good either. Back the truck up…he doesn’t like lasagna?? How can he even be my child and not like lasagna? It’s only probably my most favourite food in the world. What’s not to love about pasta, tomato sauce, and tons of ooey gooey cheese? Apparently a lot, if you happen to be Cole. But if you’re a lasagna love like I am, I’m sure you’ll appreciate this soup.
Lasagna Soup
1 lb Italian sausage
1 large onion, diced
1 green pepper, diced
3 cloves garlic, crushed
1 tsp dried oregano
1 tsp dried basil
2 tbsp tomato paste
1 can (28 oz) diced tomatoes
6 cups chicken stock
8 oz pasta of your choice (for example- fusilli, rotini, or broken-up lasagna noodles)
salt and pepper, to taste
8 oz ricotta or cottage cheese
1/2 cup grated parmesan
pinch of salt and pepper
2 cups shredded mozzarella cheese
Remove sausage from casings and place in a large soup pot over medium heat. Break the sausage up into small pieces and cook until browned. Place sausage into a mesh sieve over a large bowl to drain off the fat. Set aside. In the pot, cook the onions, green pepper and garlic until softened, about 5 minutes. Add back the sausage, along with oregano, basil, tomato paste, diced tomatoes and chicken stock. Bring to a boil, then reduce heat and simmer for 30 minutes. Add pasta and cook until pasta is done. Add salt and pepper to taste.
Mix ricotta, parmesan and salt and pepper. When serving, place a spoonful of cheese mixture in the bottom of each bowl. Ladle hot soup over top. Sprinkle with mozzarella cheese.
Serves 8.


Friday, March 16, 2012
Avocado and Banana Smoothie Shooters

Saint Patrick's Day is coming up and I've been thinking about another green drink to share with you. Last year I made Kiwi Coconut Smoothie Shooters and they were a big hit. This year I decided to try avocado smoothies in the same fun shooter glasses. I froze chunks of avocado and banana first to make it extra thick and creamy. If you want it to be similar to a Shamrock Shake (but much healthier), then try it with the peppermint extract. Cole really liked it that way, although I preferred them with vanilla extract. Mint just doesn't do it for me. Maybe if it had been fresh mint it would be better, I'm not sure. You can made these without either extract if you prefer, because it's yummy with the flavour of the banana on its own. You can't really taste the avocado in this, it simply adds a great creamy texture to the smoothie. I topped the smoothies with sweetened Greek yogurt and chocolate shavings and it was a nice touch. I bet it would be really good with the coconut whipped cream I used in the kiwi smoothies. I would have tried it but I didn't have any coconut milk handy.
Bennett missed out on these because he was taking a long nap, but Cole slurped it all up and loved it. He asked me if it was a treat and I said it's actually a healthy drink. He was happy about that because he said he had eaten too many treats already today. I'm not sure what treats he was talking about, maybe he has a stash of treats hidden somewhere! Anyway, by the time Bennett woke up, the smoothie wasn't looking so great. It goes brownish if you don't drink it right away, so it's best serve it as soon as you blend it.
Happy St Paddy's Day!

Avocado and Banana Smoothie Shooters
1 banana
1 avocado
3/4 cup milk
1/2 cup Greek yogurt (honey or vanilla flavour)
1/4 tsp peppermint or vanilla extract (optional)
honey or agave, to taste (optional)
Topping: Greek yogurt (honey or vanilla flavour), semi-sweet chocolate shavings
Peel and cut up banana and avocado into chunks, then freeze until firm.
Place frozen banana and avocado chunks into a blender with milk, yogurt, and extract (if using). Blend until smooth. Stir in honey or agave if desired for more sweetness.
Serve in shooter glasses and top with yogurt and chocolate shavings.
Other Saint Patrick's Day Recipes:
Beer Stew
Shepherd's Pie
Green Chocolate Chip Cookies
Kiwi Coconut Smoothie Shooters
Green Scrambled Eggs
Wednesday, March 14, 2012
Homemade Vegetable Stock

I had never bothered to make my own vegetable stock before because it seemed like a lot of work, but then I came across an idea from Perry's Plate that changed my mind. When you're chopping up vegetables for a meal (something you have to do anyway), toss the scraps into a freezer bag and keep them in the freezer. I added in things like the ends and skins of carrots, onions, peppers, the stems of broccoli and cauliflower, the part of the garlic that's left inside your garlic crusher, the stems of parsley and cilantro and other fresh herbs.

Eventually when your bag is getting full, you can take it out of the freezer and make up some stock. Just put it in a large pot and fill it with water. You can add any spices or salt if you like, but I didn't bother.

Let it simmer on your stovetop for at least 3 hours, but the longer the better if you have the time.
After that, get a big bowl and a mesh strainer and pour the contents through it. Then you'll have a beautiful rich broth that you can use in soups, stews, chilis, and all sorts of other recipes. Divide up the stock into airtight containers, label and date them, then freeze them. Then you can start a new freezer bag of vegetable scraps, so you'll always have vegetable stock on hand. Brilliant!

Monday, March 12, 2012
SmartSeat Chair Cover and Giveaway

I'm reposting my review of SmartSeat chair covers from last year, because there's a great giveaway happening right now for a bundle of goodies that includes these handy seat covers. If you're interested in entering, please see the form at the end of this post.
Kids can be rather messy at the dinner table, in case you hadn't noticed. Clearly, I didn't realize this fact when I purchased diningroom chairs with white seat cushions shortly before we had children. We ended up re-upholstering our chairs with a vinyl faux-leather fabric which works pretty well, but if you don't want to go to that extreme with your own chairs, you should definitely consider these great SmartSeat chair covers. SmartSeat is a patent-pending product made by pb&j Discoveries LLC, a parent-owned company based in Massachusetts. The company sent me a cover to try out on my messy children (they ship to Canada, yay!). It was a cinch to attach to my chair when I followed the video demonstration on their website. Cole noticed it as soon as he got home from daycare and was very impressed by how soft it was. I captured this video of him:
Bennett immediately tried to rip it off the seat, but it wouldn't budge, thanks to the super sticky velcro straps holding it in place. He eventually gave up and sat on it. There was quite a lot of food spilled on it over the following week, not to mention cat hair since our cat decided the seat cover was his new favourite sleeping place.

By the end of the week, the cover looked like this:

Not too bad! Not much of the food that spilled actually stuck to the cover, so that was a big plus. I gave it a quick wipe with a damp cloth, and it was good as new:

I can see this product being very useful for a lot of families with young children (and cats!). It comes in a variety of stylish colours so your seats can still look great while being protected from stains.
Disclosure: I was not paid to write this post.
Tuesday, March 6, 2012
Lentil and Roasted Red Pepper Dip

In case you haven't discovered the joy of lentils yet, let me just fill you in. These little legumes are incredibly versatile because they absorb flavours so well. They don't require soaking like other legumes, so they're fairly quick and easy to cook. You can store dried lentils for a long time, making them a perfect staple for your pantry. It's great having them on hand to add to soups, stews, dahl, and even salads. Because they're high in protein and have a hearty texture, they make a great substitute for meat in recipes like lentil loaf, lentil burgers, lentil 'meat'balls, or lentil sloppy joes. I've even seen recipes for baked goods like cookies and brownies that use lentils because they can be easily concealed while adding amazing nutritional value. They're packed full of fibre, protein, folate, potassium, and iron, to name a few. So have I sold you on lentils yet? I sound like a lentil spokesperson or something. I'm really not though, I swear, I just happen to love lentils. That's why when I heard about the Recipe Revelations Challenge at Canadian Lentils, I was excited to take it on. I came up with this dip that I'm pretty proud of, if I do say so myself. It has a beautful smoky flavour, thanks to the roasted peppers, smoked paprika and oak smoked sea salt. Regular salt will work too, but if you can get your hands on the smoked kind, you gotta do it! I've been sprinkling it on all sorts of meals lately. Anyway, back to this dip.

Tony and I thought it was awesome. The kids kept coming back to it too, especially with chips. Cole said it was "comme ci comme ca" in his smug little french immersion way, meaning he doesn't hate it or love it. He did eat an awful lot of it though so I think he liked it more than he was letting on.
I'll show you in this recipe how to roast your own red peppers. You can of course use the jarred kind if you want, but once you see how ridiculously simple it is to roast them yourself you probably won't want to go back to the store-bought kind again.

Lentil and Roasted Red Pepper Dip
1 cup red split lentils
3 cups water
1 red pepper
1 clove garlic
Juice from 1 medium lemon
1 tbsp olive oil
1 tsp cumin
1/2 tsp smoked paprika
Salt, to taste (use oak smoked sea salt if possible)
Combine lentils and water in a saucepan over high heat and bring to a boil. Reduce heat and simmer while covered until tender but not mushy, about 20-25 minutes. Place lentils in a colander to drain any excess water. Allow to cool completely.
Wash and deseed the red pepper. Cut red pepper into thick strips and lay them out on a baking sheet. Place under broiler until skin bubbles and blackens.

While they're still hot, place the pepper strips into an airtight container or bag and let them steam for about 15 minutes (this helps make the skin easier to remove).

Peel off the blackened skin and discard it, then place peppers in a food processor with cooled lentils, garlic, lemon juice, olive oil, cumin and paprika. Blend in the processor until smooth.

Add a little water if you find it too thick. Add salt to taste. Cover and refrigerate until cooled. Pour dip into a serving bowl and sprinkle with more smoked paprika. Can be served with veggies, pita bread, sliced baguette, tortilla chips, regular chips, etc.
Heck, why not just grab a spoon and dig in?

 My kids like to whine, especially when it comes to the food they eat, but that doesn’t stop me from trying to make tasty and healthy meals for them. Follow along as I share family-friendly recipes and reviews from my picky family members, who I lovingly call “The Whine Critics.”