Friday, September 28, 2012
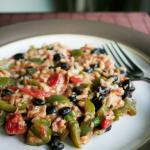
Easy Coconut-Curry Noodle Soup

This is one of those recipes that was based on what was in my cupboard and fridge at the time. Tony had taken Cole out to help my brother look for a car, and he called to say they were going to be late. Bennett and I were hungry, so I decided to make up something simple for dinner. I opened my cupboard and found a can of coconut milk and some Asian noodles. The wheels started turning. I looked to see what vegetables I had, and pulled out mushrooms, broccoli and an orange pepper. I had been on Pinterest earlier and saw a delicious looking Laksa (a Malaysian noodle dish), and was inspired by that. So that’s how this meal was born. Bennett didn’t eat that much of it, but I loved it. I put the rest in the fridge and figured I’d be the only one to eat it, but then Tony and my brother came home with Cole and they were hungry. Cole had some leftover pasta (I didn’t even bother offering him this soup because I knew it wasn’t his thing). My brother seemed interested in it though so I heated some up for him. Tony noticed it and wanted it too, so I heated up the rest of it. They both really liked it! I was glad, but I admit I was a little bummed that I didn’t get to have anymore for myself. Luckily it’s a sinch to cook, so I won’t have any trouble with making more soon.

Easy Thai Noodle Soup
8-10 oz rice noodles, or other noodles of your choice
2 tsp sesame oil
1 cup sliced mushrooms
1 cup chopped broccoli florets
1 cup sliced orange peppers
1 clove crushed garlic
1 tbsp Thai red curry paste (more or less according to taste)
1 can coconut milk
4 cups vegetable broth
salt, to taste
Cook noodles according to package directions and set aside. In a medium saucepan, heat oil and saute mushrooms, broccoli, peppers and garlic for about 5 minutes until vegetables have softened. Stir in curry paste and cook for another 1-2 minutes. Add broth and bring to a boil. Reduce heat to a simmer and add coconut milk. Stir in noodles. Add salt if desired.
Makes approx. 4 servings.


Friday, September 21, 2012
Homemade Fruit Bars

If you've been following my blog for a while, you'll know that I am on an epic search for the perfect homemade fruit-filled bar. You can read about my past experiments in Fruit-Filled Mini Cereal Bars and Fruit-Filled Mini Cereal Bars, Revisted. They were both good attempts, but I always felt they weren't quite there yet. I think this latest attempt is pretty close to what I've been envisioning in a fruit bar. These are an adaptation of a recipe from Weelicious: Homemade Fig Bars. I've replaced the fig filling with the fruit and date filling that I created in my original post on mini cereal bars. It really worked out well, and the kids scorfed them down in no time. Cole has been hounding me to make them again because he liked them so much. They are perfect for packing in lunches, or for an after-school snack that is sure to be a hit.

Homemade Fruit Bars
Adapted from Weelicious: Homemade Fig Bars
Filling:
3/4 cup dates
3/4 cup blueberries
3/4 cup strawberries
1/3 cup water or juice
Dough:
6 tablespoons unsalted butter, softened
1/3 cup sugar
1 large egg
1 teaspoon vanilla extract
1 cup all-purpose flour
1/2 cup whole wheat flour
2 tbsp ground flax seed
In a saucepan on medium-high heat, simmer the filling ingredients until the fruit is soft. Blend until smooth and thick with an immersion blender.
Preheat oven to 350F. Beat together butter and sugar until creamy. Add egg and vanilla and beat until smooth. Stir in the flour and mix until it forms dough. Divide the dough into two sections. Roll each section of the dough on a well-floured surface, or between 2 sheets of parchment paper, and form them into rectangles that are about 12 x 4 inches. Spread the fruit filling down the length of one side of the dough, leaving a 1/4 to 1/2 inch border. Fold the dough over to close in the filling and gently seal the edges by pressing with your fingers. Cut into 10 squares for each log. Transfer squares onto a parchment-lined baking sheet. Bake for 15-20 minutes until golden around the edges.

Now, I just have to share another belly pic. I'm in the 2nd trimester, and I'm finally really beginning to enjoy being pregnant again. I'm feeling the baby move, my baby bump is now noticeable, and best of all I'm not feeling sick anymore. Life is good!
 |
| 18 weeks |
Friday, September 14, 2012
Overnight Waffles with Quick Berry Sauce

My boys have both come to expect that on Saturday morning they'll be eating either pancakes or waffles. It's my own fault, or actually my parents' fault, because they made us pancakes every Saturday morning when we were kids. I couldn't imagine not carrying on that tradition with my own kids. Even now, Saturday morning is still pancake morning in my parents' home too. Usually we'll have pancakes too, but very now and then I'll spice things up a little by making waffles instead. I love this particular waffle batter recipe, because you make it the night before so that in the morning you have batter ready to go. All I need to do is heat up the waffle iron and in a few minutes we have perfect waffles. They're crispy on the outside and light and fluffy on the inside. I like to add a super quick microwave berry sauce to go on top of them. It's so fast and easy that you can make it while the waffles are cooking. We're lucky have an abundance of blackberries in this area, so we have a lot of frozen blackberries that we picked from bushes at a local park. They're perfect for this sauce when you combine them with a sweeter berry, like blueberries or strawberries. Ontheir own I find them too tart.The kids loved both the waffles and the sauce. The best part is you can freeze the leftover waffles and pop them in the toaster during weekday mornings or snacks. They're so much better than store-bought frozen waffles. I'm wondering now how this batter would work as pancakes. Maybe I'll try it tomorrow morning and report back!

Overnight Waffles
Adapted from Better Homes and Gardens
1 1/2 cups all-purpose flour
3/4 cup whole wheat flour
2 tbsp sugar
2 tbsp ground flax seed
2 1/4 tsp yeast
1/2 tsp salt
1 tsp vanilla
1 3/4 cup milk
2 eggs
1/3 cup vegetable oil
In a large bowl, combine flours, sugar, flax, yeast and salt. Add remaining ingredients and beat with an electric mixer until fully combined. Cover the bowl loosely with plastic wrap and refrigerate overnight or up to 24 hours.
In the morning, uncover the bowl and give the batter a stir. Cook on a lightly greased waffle iron according to manufacturer's directions.

Quick Microwave Berry Sauce
1 cup frozen berries (blueberries, blackberries, strawberries, etc)
1 tsp cornstarch
3 tbsp sugar (more or less, depending on berry's sweetness)
Place berries in a microwavable bowl. In another bowl, combine cornstarch and sugar, then sprinkle mixture over the berries. Cover the bowl and microwave for 3-5 minutes, stirring after each minute, until sauce begins to thicken. Allow to cool slightly before serving. Pour over waffles or pancakes.

Thursday, September 6, 2012
Granola Medallions

It's that time again...back to school! I always find it such a chore to come up with new and creative lunch ideas when packing school lunches. I get stuck in a rut of packing the same old things day in and day out. Usually at the beginning of the year I have all sorts of great lunch ideas, but my creativity quickly fizzles out as the year progresses. I tend to turn to whatever is quickest and easiest. This recipe is really quick to put together, so it's something even I can stick with. You can make it on the weekend and keep them in your freezer so you'll have a great healthy snack to pack in school lunches for the rest of the week. They're kind of like a cross between a granola bar and a cookie, which makes them fun. The best part is that the kids love them! The first time I made these, Cole told me "I love your baking mom!" That's definitely not something I hear every day from him. I love that they make the whole house smell so good when they're baking. I want to make more just to have that beautiful smell of vanilla and cinnamon wafting through the house again. I may make a double batch next time, because they certainly disappear quickly.

Granola Medallions
Adapted from Today's Parent 'Picky Eaters' Guide (Homemade Granola Coins)
1 egg
1/4 cup maple syrup
1 tbsp vegetable oil
1 tsp vanilla extract
1 cup large-flake oats
2 tbsp pumpkin seeds
1/4 cup dried cranberries
1 tbsp chia seeds
1 tbsp whole flax seeds
1/2 tsp cinnamon
In a medium bowl, whisk together egg, maple syrup, oil and vanilla. Add remaining ingredients and stir until fully combined. Divide mixture equally in a well-greased 12-cup muffin tin. Use the back of a spoon to flatten the mixture into the bottom of each cup. Bake at 350F for about 10-12 minutes, until edges are golden. Allow to cool for 5 minutes before removing from pan, using a spoon to scoop them out. Place on a wire rack to cool.

 My kids like to whine, especially when it comes to the food they eat, but that doesn’t stop me from trying to make tasty and healthy meals for them. Follow along as I share family-friendly recipes and reviews from my picky family members, who I lovingly call “The Whine Critics.”