Thursday, July 25, 2013
Homemade Popsicles and Freezies

I love the sounds of summer- children laughing, birds chirping, sprinklers spraying, lawn mowers mowing, but one sound that I absolutely dread is the irritating music from the ice cream truck. It’s not just because the songs are annoying and get stuck in my head when I don’t want them to (although I do really hate that), it’s mostly because the kids always come running to me asking if they can buy something. I cringe at spending $4 each on popsicles that are partially melted and full of food colouring and sugar. Now I always make sure that my freezer is well-stocked with homemade frozen treats so I can offer them to my boys as a healthy alternative when the ice cream truck appears.
I’ve compiled some of our favourites so far from this summer. My kids like freezies a lot, so I bought a few packages of Zipzicles from Amazon.com so we could make our own freezies. Genius! My boys and my niece were eager to try them. I set out a bunch of fruit on the counter, like watermelon, pineapple, bananas, strawberries and blueberries. I used the single serve cups from my Ninja blender so that each kid could customize their own batch of freezies.

We made all sorts of combinations (my favourite was watermelon-blueberry- Bennett’s creation). Basically it was just straight pureed fruit, or sometimes I had to add a bit of juice in order to get the fruit to blend easier. Orange juice and pineapple was very nice. We poured the mixtures into the Zipzicle bags using a small funnel or a turkey baster, then placed them upright in cups in the freezer. The kids had such a hard time waiting for the freezies to set. They kept checking the freezer every hour or so, which just let out the cold air and made it take even longer. Eventually they were ready to eat and the kids couldn’t get enough of them.
I tried a few of my own recipes later. These make pretty small portions (only about 3 or 4 freezies per recipe) so feel free to double or triple the recipes if you want more:

Triple Berry Freezies: I heated up a bowl of blueberries, strawberries, blackberries (about a cup of each). After they cooled, I blended them up with a couple tablespoons of honey. You can adjust the sweetness to taste. Pour into Zipzicle molds and freeze upright.


Pineapple Banana Orange Freezies: Blend 1 cup of chopped pineapple, 1 banana, 1 cup of orange juice. Pour into Zipzicle bags and freeze upright.
These recipes can be used for popsicles as well. I love using banana in popsicles and freezies because it prevents them from being too hard and icy. You can also use full fat coconut milk or yogurt to help keep your popsicles a little softer and creamier.
Let me tell you something else I’ve learned…Nutella is amazing in popsicles!

Banana, Nutella and Yogurt Popsicles: Mix together 1 cup of mashed banana, 1 cup of Greek yogurt, 3 tbsp Nutella. Pour into popsicle molds and freeze.
I’ve also tried this without the yogurt, just mashed banana with a tablespoon of Nutella per banana. Yum!
Here’s another great idea: put Nutella in the center of a popsicle.

Strawberry Coconut Popsicles with Nutella Center: Blend equal parts sliced strawberries and coconut milk (use full-fat for a better consistency). Pour popsicle molds half-full, then drop a spoonful of Nutella into each one. Fill up the remaining half of the mold with the rest of the strawberry-coconut milk mix. Freeze and enjoy your chocolate surprise!
Here are my boys enjoying their healthy homemade freezies. Now when they hear the ice cream truck, they run to the freezer instead.

Check out the Zipzicle website for more great ideas. I really want to try the Chia Seed Blueberry ones.
What’s your favourite popsicle/freezie recipe?
This is not a sponsored post, but does contain affiliate links to Amazon.com. All opinions are my own.

Friday, July 19, 2013
Banana Ricotta Muffins


Banana Ricotta Muffins

Monday, July 15, 2013
Summertime Salsa

Summer is the time for barbecues, picnics, pool parties, cookouts on the beach, and sitting out on the patio visiting with friends and relatives. These are all perfect opportunities to make a big batch of salsa for everyone to enjoy.
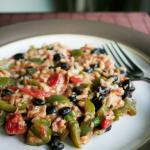
I tried out this Corn and Queso Salsa from Life Made Delicious, but decided that instead of using bottled salsa I would make my own. I had borrowed Pioneer Woman's cookbook from the library and I noticed there was a recipe for Restaurant Style Salsa that sounded easy and delicious. I changed it a little bit to make it really mild for Cole, who absolutely detests anything remotely spicy.

I pulsed the ingredients in a food processor they were fully combined and there were no large chunks left.

I took a jar of it with me to a friend's house where our kids had a water fight in the backyard. They refueled with this salsa and tortilla chips, coming back for more again and again.


I didn't bother adding cilantro since there was already a lot in the salsa. The charred corn and crumbled feta melded beautifully with the flavours of the fresh homemade salsa.

If you can manage to restrain yourself from eating this all up with tortilla chips, you can cook it with chicken for dinner. On hot summer days I hate turning on my oven, so I cooked the chicken in a large skillet on my stove-top and simmered it with this salsa.

It's such a simple summer dinner, and so tasty!
THE WHINE CRITICS

Cole gave this a "so-so" rating. I'll take that over a thumbs-down any day. He ate all of it too, so he obviously didn't dislike it too much. Bennett liked it, as usual, and gave it a thumb up. I'm thankful that he's so easy to please lately.
Restaurant Style Salsa
1 can (28 Ounce) diced tomatoes
1/4 cup chopped red onion
1 clove garlic
1/2 a jalapeno, sliced
1/4 teaspoon sugar
1/4 teaspoon salt
1/4 teaspoon ground cumin
1/2 cup cilantro (more to taste)
Juice from half a lime
Add all ingredients to a food processor and pulse until fully combined and there are no large chunks left.
Corn and Queso Salsa
1/2 tbsp olive oil
1 clove garlic, crushed
1 1/2 cups cooked corn (or canned corn)
1/8 tsp smoked paprika
1 3/4 cups of Restaurant Style Salsa (recipe above)
3/4 cup crumbled queso fresco or feta cheese
Heat olive oil in a non-stick skillet over medium heat. Add garlic and corn; cook until the corn begins to brown. Sprinkle with smoked paprika. Remove from heat and allow to cool.
Add cooled corn to salsa and stir to combine. Top with cheese.
Corn and Queso Salsa Chicken
8 boneless skinless chicken thighs
1 batch of corn and queso salsa (recipe above)
Fry chicken thighs in a non-stick skillet over medium heat until the chicken has browned slightly. Add salsa and simmer covered until chicken has cooked through (about 20 minutes).

Here are some other ideas for summer salsas and dips.
Easy guacamole: mash up an avocado, add a few tablespoons of salsa and a splash of lime juice.

I made this Skinny Poolside Dip from Buns in My Oven for a family barbecue yesterday. So yummy!!
From Life Made Delicious:
So Simple Salsa Dip
Creamy Salsa Dip
Funny Face Taco Dip
Grilled Vegetable Salsa
Disclosure: I am part of the Life Made Delicious Blogger program and I receive special perks as part of my affiliation with this group. The opinions on this blog are my own.
Friday, July 5, 2013
Slow Cooker Chicken Tikka Masala

I don't know about you, but I don't feel like cooking when it's really hot out. I'd rather spend the afternoon outside in my backyard with a cold drink in my hand, enjoying the sunshine while the kids play. That's why I love using my slow cooker on hot days. I can get dinner started early in the day before it gets too hot, and then I can enjoy my afternoon and evening without worrying about dinner or heating up my kitchen with the oven.

A friend posted this recipe on facebook and I immediately pinned it. It looked almost too easy. There aren't many ingredients to assemble and luckily I already had all of them on hand, even garam masala. If you're not familiar with garam masala, it's definitely worth trying. It's a blend of spices that is often used in Indian cuisine, made with cinnamon, cloves, cardamom, and cumin. If you'd like to try making your own, here's a good garam masala recipe at about.com.
THE WHINE CRITICS

I'm just realizing this is kind of a funny photo. I'm not really sure why Cole has his shirt neck stretched over his shoulder like a girl from the 80s and Bennett is staring blankly into space, but in any case, they liked it! Both of them actually liked it! They thought it was fun to add the cucumber and cilantro mixture on top of their chicken. I thought that was a nice touch too; it makes the meal so much more colourful and interesting. I can see this one becoming a family favourite for sure.

Now I guess you probably want the recipe. You can find it at Real Simple (and it really is simple!). The only change I made was using coconut milk instead of heavy cream. I just like a hint of creamy coconut in my Indian food. I think yogurt would be a good substitute as well. I served it over brown Basmati rice and with a side of Naan bread. Delicious! Best of all, I got to enjoy the beautiful sunny day while the slow cooker slaved away in the kitchen for me.

Tuesday, July 2, 2013
All But Gluten. It's all good.

I was recently given the opportunity to sample a couple of All But Gluten products. Although I'm not on a gluten-free diet myself, my mom has a gluten sensitivity so she avoids gluten whenever possible. When she comes to visit I try to have gluten-free foods for her. I'm always impressed with the amount of gluten-free products on the market today. It seems to be easier than ever to find gluten-free choices nowadays. The hard part is finding ones that actually taste good and have all the nutrients that you would find in regular bakery staples. I was happy to find that All But Gluten tastes just as good as traditional bakes goods and that most of their products are enriched with vitamins, minerals and are a source of fibre. They're also manufactured in a dedicated gluten-free facility and bear the Canadian Celiac Association's Gluten-Free Certification Program Mark of Trust on the packaging.
When I went to Save-on-Foods to look for All But Gluten products to try, I expected to find them in the bakery freezer, but they were actually sold fresh on display as soon as I walked in the door. That was a pleasant surprise. I was also surprised how many products there were to choose from, like whole grain loaf, sliced white loaf, cinnamon raisin loaf, focaccia, pizza shells, muffins, brownies and macaroons. I decided to try roasted onion focaccia and pizza shells.
That night, we tried the pizza shells.

I bought a rotisserie chicken from the deli so we could have chicken pizza. I also used some regular pizza shells as well in order compare them. We had ranch chicken pizza, using ranch dressing as the sauce, and barbecue chicken pizza, using barbecue sauce. I topped them with pieces of rotisserie chicken, orange and yellow bell peppers, red onion, and mozzarella cheese. There were no baking instructions on the package for the pizza shells, so I just baked them at 425F for about 8 minutes, until the edges began to brown. I like my pizza a bit crispy, but if you want them softer you could use a lower heat.


THE VERDICT

The kids loved it! They had no idea it was gluten-free, nor did they care. They actually preferred the gluten-free crust over the regular pizza crust. I asked Tony afterwards if he liked the gluten-free pizza and he said "which one was gluten-free?" He had no idea. He thought they were all yummy. I found the gluten-free shells had a spongier texture, but not in an unpleasant way. I liked that they were lighter than the regular pizza shells, which were more dense and chewy.

The next night we tried the roasted onion foccacia.

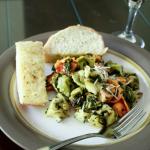
I wanted to try something like the Roasted Chicken Sandwich with Avocado Spread from the All But Gluten website, but we had used up all the chicken from the pizzas the day before, so I made a meatless sandwich. I used mozzarella cheese, tomatoes, fresh basil, and avocado spread. I topped them with blue cheese-stuffed olives on toothpicks and served them with my homemade minestrone soup.

This one was not such a hit with my boys, but it had nothing to do with the focaccia. They just didn't like what I did with the focaccia. Apparently avocado sandwiches are not as appealing to them as they are to me. Tony, who doesn't like focaccia, actually enjoyed this more than I (or he) had expected. Although it was a bit crumbly and delicate, this focaccia had amazing flavour and was surprisingly moist.

Tomato, Mozzarella and Basil Focaccia with Avocado Spread
1 loaf of Roasted Onion Focaccia
1 ripe avocado
2 tbsp ranch dressing
1 tomato, sliced
4 oz sliced mozzarella cheese
8 fresh basil leaves
Whole stuffed olives (optional)
Pre-heat oven to 300°F. Slice the All But Gluten™ Roasted Onion Focaccia horizontally to form a top and a bottom half.
In a small bowl, mash avocado and mix with ranch dressing. Spread it onto both sides of the focaccia.
Layer cheese and basil leaves on bottom half of focaccia. Cover
with top half and wrap in foil. Place in pre-heated oven for 15-20
minutes or until warm and cheese is beginning to melt.
Remove focaccia
from oven and let rest for a few minutes then open them up and place slices of tomato inside. Close them up, cut into wedges. Pierce with toothpicks topped with olives, if desired.

Explore the world of All But Gluten ™ and rekindle your love of baked goods.
For more information click here http://allbutgluten.ca
All But Gluten on Facebook
All But Gluten on Twitter
All But Gluten on Pinterest
This sponsorship is brought to you by The Gluten Free Agency who we have partnered with for this promotion.
All But Gluten™ has provided me with free products and compensation for writing this post, but all opinions are my own.
 My kids like to whine, especially when it comes to the food they eat, but that doesn’t stop me from trying to make tasty and healthy meals for them. Follow along as I share family-friendly recipes and reviews from my picky family members, who I lovingly call “The Whine Critics.”