Wednesday, October 30, 2013
Happy Halloween
Here’s a healthy Halloween snack that you might want to try- Green Monster Guacamole. To see my recipe, head on over to Popsugar.

I also have a new article published at Yummy Mummy Club: How to Get Your Kids to Pack their Own Lunches. It’s been a lot less hectic getting ready for school since the boys started making their own school lunches the night before. It’s really not hard to train your kids to do this, and it’s such a lifesaver. I hope you find my tips helpful.
Happy Halloween everyone!

Tuesday, October 22, 2013
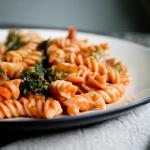
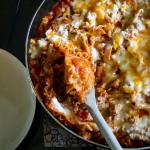
Chicken Pot Pie {No Condensed Soup}

A few years back I posted a recipe for Lazy Chicken Pot Pie. It was a really simple and tasty dinner, but the one thing that always bugged me about it was that it used condensed cream of mushroom soup. Condensed soups are full of sodium and they're so easy to substitute "cream of...soup" with a healthier homemade version. This is what I've done in this recipe, and it turned out just as creamy and delicious as the original recipe. I still used frozen vegetables to make it somewhat "lazy" and quick. Not only are frozen vegetables fast, they are just as nutritious, if not more so, than fresh produce because they're frozen at the peak of ripeness.

What did the Whine Critics think? Well, unfortunately I didn't get a photo because they weren't all sitting at the table at the same time. Cole wasn't feeling well, Ayla was napping, so it was just Bennett with us. He said it was "a little good" but he didn't eat all of it.
Tony, on the other hand, ate it all up. I had told him we were having chicken pot pie and he seemed a little disappointed, but when he saw it and tasted it he said, "Oh this is chicken pot pie? This is good!" He must have thought I meant it was an actual pie or something. This version is more like chicken and biscuits, which he apparently prefers.
Chicken Pot Pie (No Condensed Soup)
Ingredients:
Filling
2 tsp olive oil
1 onion, diced
1 cup celery, sliced
1 yellow orange bell pepper, diced
1 tsp dried basil
1/2 tsp died thyme
1 1/2 tbsp flour
1 can evaporated 2% milk (370 ml)
3 cups mixed frozen vegetables (ie corn, peas, carrots, etc)
2 cups cooked chicken, chopped (I used a rotisserie chicken)
Salt and pepper, to taste
Biscuit Topping
1 cup all-purpose flour
1/2 cup whole wheat flour
1 tbsp baking powder
1/2 tsp salt
1 1/2 tbsp sugar
1/4 cup cold butter
1 egg, lightly beaten
3/4 cup milk
1/2 cup shredded herbed Havarti cheese
Directions:
- Preheat oven to 350 F.
- Heat olive oil in a large non-stick skillet over medium heat.
- Add onion, celery, bell pepper. Saute until vegetables have softened.
- Sprinkle basil, thyme and flour over the vegetables.
- Whisk in the evaporated milk. Continue whisking until it comes to a boil and thickens.
- Add frozen vegetables. Cook until vegetables have thawed.
- Add chicken, cook until chicken has heated through.
- Season with salt and pepper, to taste.
- Pour the mixture into a 3 quart casserole dish.
- Prepare the biscuit topping by combining flour, baking powder, salt and sugar in a large mixing bowl.
- Cut in the butter with a pastry cutter.
- Make a well in the center, and add egg and milk. Stir until fully combined.
- Mix in the cheese.
- Drop spoonfuls of dough on top of the chicken mixture, until most of the top is covered.
- Bake for 25 minutes, or until the topping is fully cooked through and begins to brown.

Thursday, October 17, 2013
Tips for Stress-Free Holiday Meals

Prepare Ahead


Cranberry sauce is another great one to make the day before, or even earlier. I think it tastes better when it has time to sit in the fridge. I used to never make my own cranberry sauce until I discovered it's so incredibly simple to make! It'll impress your guests too when you tell them you made it from scratch.


Here's the cranberry sauce recipe that I like to use.
This time I just used whole orange peels instead of orange zest, then pulled out the peels when the sauce was done. It gives a more subtle orange flavor than the zest. You could also add a cinnamon stick in there if you'd like, instead of powdered cinnamon.
Plan a Schedule
It really helps to have a schedule of when to do what. That way you don't forget anything, burn anything, or leave too many things until the last minute. First of all, determine the cooking time for your turkey and plan around that. I used this site. I like to plan to have it out of the oven around an hour before dinner time, so I have plenty of time to make the gravy, remove the stuffing, and carve the turkey. It's good for a turkey to sit for a while before you carve it so the juices get absorbed back into the meat to make it more moist. I just put tin foil over it to keep it hot.
This year, my bird was 10 lbs, so I planned on 3 1/2 hours of cooking time. I wanted dinner to be on the table by 7, so my schedule went something like this:
1:30pm- Pull the turkey out of the fridge (I used a fresh turkey, so no thawing necessary). Prepare the stuffing. Preheat oven.
2:00pm: Stuff the turkey.
2:30pm: Put the turkey into the oven
5:00pm: Pull out the mashed potatoes, yams, broccoli and cauliflower casserole (which I had made the day before) from the fridge and let them sit at room temperature.
5:30pm: Set the table (or better yet, get husband to do it).
6:00pm: Turkey comes out of the oven (check the internal temperature to make sure it's cooked). Remove from the roasting pan and place on a cutting board. Cover with foil and let it sit. Turn oven to 350F.
6:10pm: Make your gravy with the pan drippings.
6:20pm: Put the potatoes, yams, and broccoli-cauliflower casserole into the oven.
6:30pm: Scoop the stuffing out of the turkey, place it in a serving dish and cover it.
6:40pm: Get husband to carve the turkey. Check the food in the oven to see if it's heated through. If not, put it back in for another 10 minutes, or to speed things up, use the microwave.
6:50pm: Start getting food on the table. Don't forget the cranberry sauce!
7:00pm: Dig in!
Okay, so that schedule may seem hectic but a lot of it is just taking things in and out of the oven. It's really not bad at all. Don't be afraid!
Help is a Good Thing
Get your spouse or other relatives to help as much as possible. If they offer to bring something, take them up on it. If people ask me what they can bring, I usually say appetizers, wine, or dessert.
I find that everyone seems to like to congregate in the kitchen, so we set out appetizers and wine on the kitchen counter so people can snack and visit, and maybe lend a hand with the meal if they want.
It's Okay not to Make Everything from Scratch
Do yourself a favor and pick at least one part of your meal that you buy pre-made. For me, this is usually dessert. I bought a pumpkin pie this year. I did whip the whipping cream myself after dinner while my husband made the coffee and tea, but that was the extent of my efforts. It was nice to have one less thing to think about.
Make the Most of Leftovers
When your meal is over and you have a ton of leftovers, put them to good use. I use the turkey bones to make stock, and then make a turkey soup, like this one.

If you have a lot of mashed potatoes left, make gnocchi! I make more mashed potatoes than I need just so I can have enough leftovers to make it.
Cranberry sauce is excellent in muffins. I tried this recipe the other day and it was fantastic!
If you're looking for holiday dinner recipe ideas, check these ones out from Life Made Delicious:
Stuffed Roast Turkey and Gravy
Beer and Rosemary Turkey
Parmesan Butternut Squash Gratin
Green Bean Amandine Casserole
Impossibly Easy Pumpkin Pie
Good luck with your next turkey dinner; I hope these tips have been helpful.
What are your tips for making holiday meals easier?
Disclosure: I am part of the Life Made Delicious Blogger Program through Mom Central Canada and I receive certain perks as part of my affiliation. Opinions are my own.
Wednesday, October 9, 2013
Quick Baked Donuts

During the summer I made these delicious donuts for Bennett because he was sad when he saw some older kids making donuts in their summer camp and he didn't get to. I told him we could make our own donuts at home. I made the donuts, took the photos, ate the donuts, wrote down the recipe...
...and that was it.
Somehow I completely missed uploading the donut photos from my camera, so I never made it as far as editing them and writing a post. Luckily, I came across the photos when I was looking through my camera and made sure to upload them this time. I can't believe I almost missed posting such a great easy recipe! No waiting for them to rise, no frying, no donut pan required. You just make the dough, roll it out, and cut out donut shapes. I used a glass, and the cap from my almond milk carton.

Next, they went onto a baking sheet (holes in the middle, because they cook faster).

Then they come out looking like this:

Look at those beautiful, light, fluffy donuts. Now comes the fun part: decorating! My boys had a blast smearing on the icing and loading them full of sprinkles.

I dipped some in butter, then in a mixture of cinnamon and sugar. Deee-licious!

I can't get enough of these things. Best of all, Bennett forgot all about those older kids with the donuts when he got to make his own. We had such fun!
Quick Baked Donuts
1 1/2 cups flour
1 tbsp baking powder
1/2 tsp salt
1/4 cup granulated sugar
1/3 cup shortening or butter
1 egg, lightly beaten
1/2 cup milk
1 tsp vanilla
- Combine flour, baking powder, sugar in a large bowl. Using a pastry cutter, cut in butter until mixture resembles coarse crumbs.
- In a small bowl, combine milk, egg and vanilla. Add to dry ingredients and stir to form a ball with the dough. Add more flour as necessary if it's too sticky.
- Knead on a floured surface for a few minutes, then roll it out and cut into donut shapes. Place on a greased cookie sheet, putting the donut holes along the middle of the sheet.
- Bake at 375F for 12-15 minutes, depending on the size of your donuts (the small holes will be finished faster than the larger donuts).
- Decorate as desired (icing, sprinkles, nutella, butter with cinnamon and sugar, etc).

Wednesday, October 2, 2013
First Moments with Cheerios

I especially like Bennett's startled face as I try to feed him; he's always been such an expressive little guy. Neither of the boys was very keen on eating solids at first, but Ayla went crazy for solid food right from the start. The girl loves her food, just like her momma!
Watching my babies experience new things is so exciting. I'm actually not sure who gets more excited, them or me! I couldn't wait to feed Ayla Cheerios for the first time. Cheerios have always been the staple finger food for the wee-ones in our house, and the boys still eat them for breakfast or snack quite often. Ayla had been watching her brothers eating Cheerios and was ready to join them.

Disclosure – I am participating in the First Cheerios blogger campaign by Mom Central Canada on behalf of General Mills. I received compensation as a thank you for participating and for sharing my honest opinion. The opinions on this blog are my own.
 My kids like to whine, especially when it comes to the food they eat, but that doesn’t stop me from trying to make tasty and healthy meals for them. Follow along as I share family-friendly recipes and reviews from my picky family members, who I lovingly call “The Whine Critics.”